Crafting Seamless & Durable Surfaces, One Tile at a Time
- Home
- Utility
- News & Blogs
- Crafting Seamless & Durable Surfaces, One Tile at a Time
Crafting Seamless & Durable Surfaces, One Tile at a Time
Crafting Seamless & Durable Surfaces, One Tile at a Time
In today’s modern construction and interior design industry, tile installation is no longer just about placing tiles—it’s about precision, durability, and long-term performance. With the rising demand for porcelain, GVT, and PGVT tiles across residential, commercial, and industrial projects, following the correct tiling application process is essential to achieve flawless results.
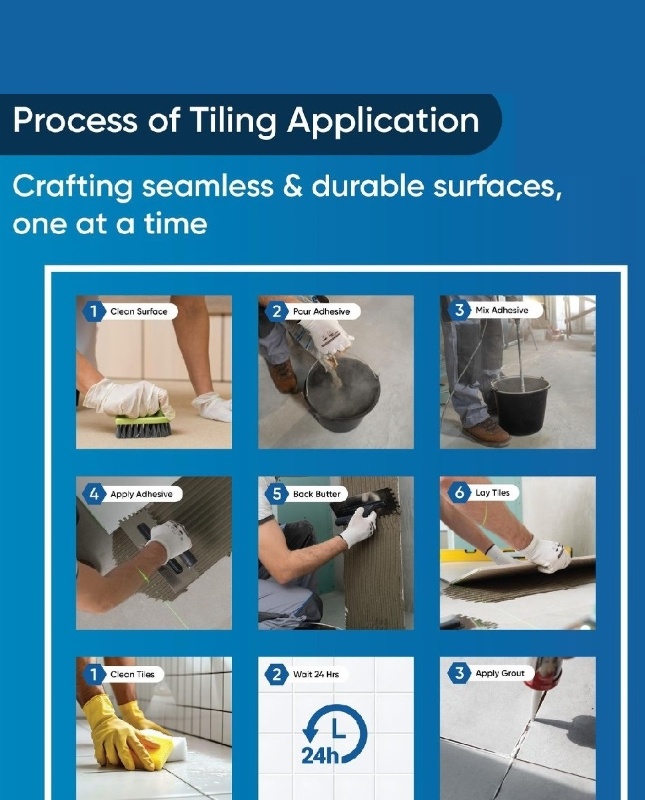
Below is a step-by-step guide to the professional tiling application process, based on current global installation best practices (2026).
A clean and well-prepared surface is the backbone of long-lasting tile installation.
Before starting, ensure the surface is:
-
Free from dust, oil, grease, and loose particles
-
Structurally sound and level
-
Completely dry
Why it matters:
Improper surface preparation can lead to tile debonding, cracks, and uneven finishes over time.
Preparing the Adhesive – Strength Begins Here
Tile adhesive must be mixed according to manufacturer guidelines using clean water and proper tools. Modern polymer-modified adhesives provide:
-
High bonding strength
-
Improved flexibility
-
Better moisture resistance
Pro Tip (2026 standard):
Always use thin-set adhesives compatible with porcelain and large-format tiles for superior adhesion.
Applying Adhesive on the Surface
Using a notched trowel, spread the adhesive evenly across the surface. The notches help maintain:
-
Uniform thickness
-
Strong mechanical grip
-
Proper air release
This step ensures consistent bonding across every tile.
Back Buttering – Essential for Large Format Tiles
For porcelain, GVT, PGVT, and large-format tiles, back buttering is strongly recommended.
A thin adhesive layer is applied to the back of the tile to:
-
Eliminate air pockets
-
Improve load distribution
-
Enhance tile-to-surface contact
This step is now considered a global best practice for premium tile installation.
Laying the Tiles – Precision in Every Placement
Tiles are carefully placed onto the adhesive bed and gently pressed to ensure full contact. Tile spacers are used to maintain:
-
Uniform grout joints
-
Perfect alignment
-
Professional finishing
Accuracy at this stage defines the overall aesthetic of the project.
Setting Time – Patience for Performance
Once tiles are laid, allow the installation to set undisturbed for at least 24 hours.
This curing period ensures:
-
Strong bonding
-
Structural stability
-
Reduced risk of movement or cracks
Avoid walking on or loading the tiled surface during this time.
Grouting – The Final Touch
After curing, grout is applied to fill tile joints. Modern grout solutions offer:
-
Water and stain resistance
-
Anti-fungal properties
-
Long-lasting color consistency